UNIT 20 – Single Camera Techniques; Depth of Field
The area in front of the camera that appears sharp in the frame is called depth of field. Depth of Field (DoF) is defined as the range of acceptable focus on a shot or photograph. Depth of field is an important concept for cinematographers and camera operators to master because they often need to manipulate focus to achieve a desired effect. Selective focus, for instance, draws the audience’s attention to a specific portion of the frame.
Depth of field can be either shallow or deep. Shallow depth of field is the kind in which part of the frame is soft or out of focus. Thus, the areas of focus or sharpness are limited. Deep depth of field, on the other hand, is the kind in which the entire frame, from the foreground to the background, is sharp or in focus.
These three parts of the camera affect depth of field:
- Aperture
- Focal length
- Focus distance
The Aperture
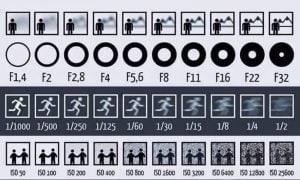
The aperture is the factor that most influences depth of field. The wider the aperture is, the shallower depth of field will be. A low f-number such as f/2.8 will likely render an image with some soft focus. Conversely, the narrower the aperture is, the deeper depth of field will be.

Focal Length
Next to the aperture, the second factor that most affects depth of field is focal length. The longer the lens, the shallower depth of field is. A wide angle lens (a short lens), for instance, would render an image with more depth of field than one with a telephoto lens (a long lens).
Focus Distance
Focus distance is the last factor to determine depth of field. The closer the focus distance is to the camera, the less depth of field you have. You probably have noticed this. On close-ups of actors or objects, part of the frame is usually blurrier than on wide shots of landscapes.
ISO
The ISO speed controls the sensitivity of the film or the sensor that absorbs the light. The higher the ISO speed, the more sensitive the film or sensor is to light.
The word ISO isn’t exclusive to photography. It’s the short-form name for the International Organisation for Standardisation [source: ISO]. This standards body was the first to combine competing classifications for the sensitivity of film into one uniform system. Under the ISO system, the lowest speed — and therefore the least sensitive film — is 100. From there, each setting, or stop, doubles in sensitivity and doubles in number: 200, 400, 800, 1600, 3200 and so on. The highest ISO speed on top-end digital cameras is 102,400.
The following chart gives you a basic understanding of how aperture, shutter speed and ISO affect your filming.

Shallow DoF – Once Upon a Time in the West (1968) Dir. Sergio Leone

Deep DoF – Citizen Kane (1940) Dir. Orson Welles
UNIT 20 – Single Camera Techniques
Our next task we shall be covering the following criteria for Learning Aim A:
P2 – Explain the use of Single Camera Techniques
To fulfil this part of the criteria, in teams of four, you will be producing your own moving image examples to illustrate different single camera techniques, as well as providing some written information. You will be blogging this information.
For each technique below, devise an inventive and interesting way of shooting it. Also, consider the reason for using the technique, as well as the meaning / motivation behind using it.
Shot types:
Establishing shot
Master shot
Tracking shots
Cutaways
Shot framing:
wide shot
mid shot
medium close-up
extreme close-up
point of view (POV)
Filming conversations:
over-the-shoulder angles
three angle shooting
shot-reverse-shot and the 180-degree rule
shot composition and framing.
Camera angles:
eye level
bird’s-eye
high angle
low angle
Dutch tilt
Camera movement:
handheld camera / shoulder mount / Steadicam®
dollying, trucking and panning
zooming and consideration of the effect on the angle and framing of the shot
dolly zoom or ‘trombone shot’
focus pulling
Maintaining continuity:
ensuring consistent scene set-ups
ensuring consistent lighting (lighting set-up or awareness of natural light and weather conditions at different times of day)
use of tripods to ensure shot stability and consistent positioning.
Shooting for eye-line matching.
EXAMPLE
Establishing shot
Provide a description – Usually an extreme long or long shot offered at the beginning of a scene or sequence providing the viewer with the context of the subsequent closer shots.
Embed your own moving image shot example –
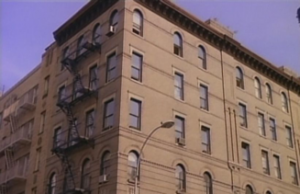
Why would you use this technique? – At the start of a film or video it is generic for establishing shots to be composed of an external location, which usually establishes the geography, time of day and often the time of the work. However, establishing shots can be used to indicate to an audience a shift in location or time during the body of the film. Internal establishing shots may indicate the importance of an interior. For example; the TV sitcom Friends (1995-2005) cuts from the opening title sequence establishing skyline shot of New York, to an exterior shot of the characters’ regular meeting place ‘Central Perks’. This shot need only be filmed once and can be used in every episode
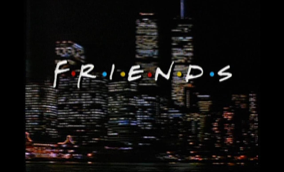

Establishing shots –cut from NYC skyline to Ext. of coffee shop
How may the technique be effectively used? – The effectiveness of this technique can often provide an audience with a sense of familiarity – for example, a wide shot of the Eiffel tower immediately lets the audience know that the action is taking place in Paris; an exterior shot of Central Perks provides them with the warm feeling of the familiar.
When shooting your material you must also consider the focal distance, depth of field, lens aperture and shutter speed. For a reminder of what these are please see the next post.
UNIT 20 -Single Camera Techniques – A Guide to Completing Learning Aim A
For the first part of the assignment it is important that you structure your online report to cover the full criteria and ensure you have included enough detail to gain either a Merit or Distinction. For this part of the assignment you will be working towards the following;
| Unit 20/A.D1 | Evaluate detailed examples of the uses of different single camera techniques and their effectiveness in different types of single camera production. |
| Unit 20/A.M1 | Analyse the use of single camera techniques within different types of single camera production. |
| Unit 20/A.P1 | Explain the purposes of different types of single camera production. |
The following criteria will be covered in the second part of the assignment;
| Unit 20/A.P2 | Explain the use of single camera techniques. |
Please use the following guidance to help you. Remember, this is a report, not an essay, so use subheadings to structure your assignment.
INTRODUCTION
You have started this part of the assignment already. Please use your notes from the first two lessons, but expand your responses to include as much detail as possible. There is no need to use detailed examples in this section, but you may refer to film and TV programmes to help support your statements.
- Start with a clear definition of what a single camera production is. If you are using a quotation from the internet, please remember to site your source (no Slide Share or Wikipedia please!). Be as precise and detailed as you can here.
- Provide a brief history of the techniques from early Hollywood to modern TV. Use the internet to research this – remember to place TV/Film titles in italics, followed by the year of production.
- How SCPs differ from a multi-camera production. In this section, you must first explain what a MCP is to make the comparison. You may use illustrations to support your points.
ADVANTAGES OF SINGLE CAMERA PRODUCTIONS
In this section, you should look for at least FIVE advantages for shooting a production using the single camera method. You may use bullet points if you wish, but full sentences are needed.
DISADVANTAGES OF SINGLE CAMERA PRODUCTIONS
As above.
You should follow this section with a couple of sentences explaining what the rest of the report will consist of – i.e. the investigation of different types of SCPs and the different purposes of using the SCP method of shooting for each. You should then systematically analyse and evaluate the techniques used in each of your own FOUR examples and ONE of the examples we completed together in class. Write in full sentences and use images and embedded YouTube clips to illustrate. Each section should contain the following;
NAME OF SCP TYPE AND EXAMPLE
- Describe the type of single camera production and what various platforms it is produced for.
- Explain both the purpose of the production (to entertain, inform, promote etc.) and why it employs single camera techniques (i.e. the benefits of this type of production using SCP techniques).
- Provide some background info on your production example. Year / who made it (director and production company) / platforms it was released on / what it is about / how successful etc.
- Embed the youtube video example and add a supporting caption. Note – this is only relevant to when you finally blog your post.
- An analysis of the SCP techniques used in the example. Which techniques are employed by the director and what effect do they have on the audience. Remember to use media language to describe the techniques – if in doubt…ask me! Be specific in the examples you are using and illustrate with screen-grabs.
- Evaluate the success of the techniques used and their effectiveness in producing the desired audience response.
Please create and produce the report using Micro-soft word. The final report should be approx. 4000-5000 words.
Unit 19 – Screenwriting – week 12 (penultimate week)
UNIT 10 – Shooting Kit…what you need – Week 4
Most of you are now ready to shoot or have begun shooting already. To avoid any disappointments and/or lost time whilst on set, it is important that you turn up with a full kit. This should include:
Camera
Microphone
Tripod
Boom pole
Battery (camera) + spares
Clapperboard
Memory cards
Storyboards
Script
Costumes
Props
Map of location
Your kit could also include:
Lights
Extension cords
Masking tape (for taping down electrical cables…health and safety first!)
UNIT 10 – Logging your rushes – Week 4
During a film shoot, you’ll be capturing a lot of footage. Because your actors made some mistakes or because you wanted to take a few extra shots for safety, you may end up with several versions of the same angle or shot. During editing, these shots will look similar, which makes it hard to know which shot was the one you liked the best.
For this reason, you can make notes about each shot captured on a shot log sheet, which makes editing much easier and ensures you don’t miss the best take from each angle.
Some shot log sheets can get very complicated, especially for big‐budget films, because they record information about the footage, including details of timecode, type of lens, focus, and filters, which isn’t always needed for smaller productions. The following list includes useful information for you to note on your shot log sheet when filming:
Scene number: This is where you enter the scene number that you’re filming. This is useful because you may end up shooting more than one scene in a day, and because you may end up filming your scenes out of order. By recording the scene number, your shot log sheet will help you organize your clips when importing and editing your footage.
Take number: Here you enter the number of times a shot has been taken. (The number of “takes.”) This number resets every time you change the angle or shot. If you set up a close‐up, for instance, the first recording you make from this angle gives you the take number of 1. If you retake this shot without changing the angle, the take number will then be 2. Tracking takes helps you keep track of the number of times you filmed a shot. Usually, of course, the last take is the best.
Clip number or name: This is where you enter the name of the clip or the number of the clip on the media card you’re recording to. (The clip is a segment of video recorded as a file to the media card or tape.) Some cameras will show the name of the clip when you watch the footage back on the camera. If your camera doesn’t show the clip name, just enter the clip number, which will be “1” for your first shot.
Duration: The length of the shot in minutes and seconds.
Shot description: This is where you enter the details about the shot you’re filming. Here you may wish to note information about the shot type, the characters in the frame, and what happens in the shot. This information helps you identify the shot when importing and editing the footage.
Use Y/N: You will probably have multiple takes of the same scene, so here is an indication of which one is the best and which ones are for bin!
We have produced a rushes log-sheet for you to use and you can find copies of them in the edit suite. It looks like this:

UNIT 10 – Learning Aim B – Week 3
You are all now in the full flow of preproduction and are all developing credible ideas within recognisable generic codes and conventions. Some groups are struggling with story-boarding, mainly because you feel you are not strong enough artists. If this applies to you, have a look at this video;
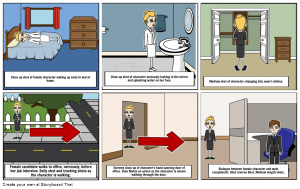
There are other alternatives to drawing your own boards. Storyboard That provides free (albeit limited) access to drag and drop templates that help you produce a neat-looking board within minutes. The downside is that you have to share your work with the internet…although you can remain anonymous.
UNIT 10 – Learning Aim B – Week 1
Congratulations! You have all completed your first submission for Unit 10 / Learning Aim A. In this Learning Aim we have looked at the mechanics of film in both macro and micro detail. We saw how narrative and genre are often structured to deliberately appeal to certain audiences, as well as how the meaning of a film is encoded within the cinematography, mise-en-scene, editing and sound.
Now comes the exciting part…
Learning Aim B concerns itself with the pre-production and production of a short fictional film or film extract. You will be placed into groups of three and you will produce material for a fiction film of a specified genre. This learning aim follows on from Learning Aim A in which you analysed films in order to inform your own film production.
In this Learning Aim, you will need to demonstrate that you can manage the filming process and acquire high-quality footage that is fit for a particular purpose (an identified genre or audience). Because you will be working in groups on film making projects, each member will need to be organised so that every member of the group can have an identifiable scene that they have directed or filmed. Care will need to be taken to achieve this without disrupting the overall style of a film (if two scenes are made in hugely contrasting styles, for example) but it is important that every member of the group has an opportunity to demonstrate their ability in this respect.
This Learning Aim begins with an agreed proposal / treatment to turn into a short film. It is important that I manage and approve the films to be put into production carefully to ensure that they can be measured against a particular purpose or genre, are realistic and that they give sufficient opportunities to each member of the group.
Before filming there are a number of pre-production processes which need completing to ensure a smooth production process. These include;
- a detailed proposal / treatment
- screenplay
- storyboard
- production schedule
- location recce
- production budget
What is a Proposal?
Once your group have decided on a feasible idea you should be ready to produce a detailed proposal. A proposal (or treatment) is a detailed written document designed to obtain approval and support for the project. It should be written in a clear and engaging language that meets the expectations of media producers. It should also be approx. one page long.
A proposal should contain the following; a brief synopsis and rationale for the project (including genre); the structure; main characters; specific information regarding audience; influences; budget and schedule; and key personnel. A completed version looks a bit like this;
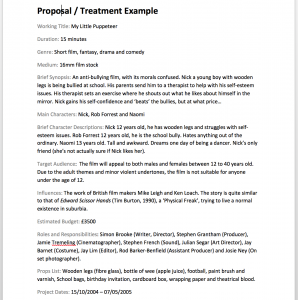
You can find a blank template of this document on Godalming Online.
Once you have had your proposal approved you are ready to produce a screenplay and storyboard. You are well tutored in the structure of a film screenplays – on the maxim that each page is approx. 1 minutes of screen time, you should be producing between 4 and 5 pages of correctly formatted script.
What is a storyboard?
The important part of a storyboard is the story. It is a way of telling your narrative visually, rather like a cartoon strip. Essentially a storyboard tells the story of your film in small hand-drawn pictures. The great thing is you do not have to be a good artist – photographs and stick men drawings are fine.
The importance of a storyboard is to see how all the shots fit together to tell your narrative before you go out and shoot the video. This is like having a visual script.
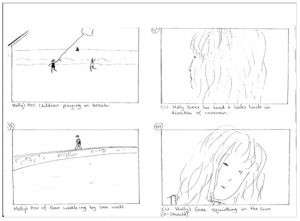
It is essential that the storyboard frames match the images you want to use in your film frame for frame in sequential order. It is also important that each frame includes essential written technical information for filming. This should include – shot number; camera framing (CU, ExCU, LS etc.); brief description of the shot; an indication of camera movement (zoom, track, etc.) supported by arrows to indicate the direction. Here is an example;
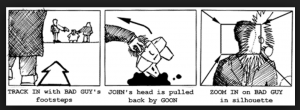
You will find examples and templates for storyboards on Godalming Online.
What is a Shooting Schedule?
A shooting schedule indicates the total number if days recording that will actually be required to complete the project. Shooting schedule information is assembled to include all major personnel, equipment and locations needed for the entire production. A completed version looks like this;
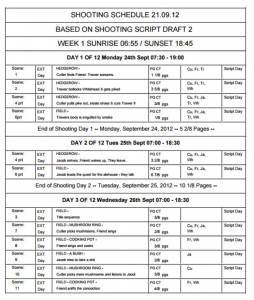
Again, you can find a template on Godalming Online.
What is a location recce?
A good location recce involves finding suitable locations for each scene and logistically working out what the possible problems would be when filming. It is important that you fully explore the location and provide still images as evidence of suitability, as well as a map and detailed location details. Please use this template (also on Godlaming Online).
What is a detailed production budget?
A production budget indicates all of the costs, regardless of how small, and if unknown, a professional estimate must be made. Please use the template provided.
Diary Blog
As you are producing your pre-production materials and experimenting with production techniques, it is essential that you record your progress on your blog. Keep a daily diary entry of what you have done, what you have learnt and evidence of your decisions and progress.
Good luck folks…I’m looking forward to seeing your creative ideas!
MVP
UNIT 19 – Screenwriting – Week 4
The eagle eyed among you would’ve noticed that there was no recap this week. Instead I’m experimenting with putting one of the resources up on the blog. The last piece of criteria ‘A2.a What are the Legal and ethical considerations for scriptwriters in the media industry?’ is particularly tricky and quite dense. So here is a handy document that should help you approach blogging about the last piece of criteria.
There is a task involved that will encourage you to come up with relevant examples to refer to.
Happy blogging.
S
