January 21

UNIT 20 – Single Camera Techniques; Depth of Field

The area in front of the camera that appears sharp in the frame is called depth of field. Depth of Field (DoF) is defined as the range of acceptable focus on a shot or photograph. Depth of field is an important concept for cinematographers and camera operators to master because they often need to manipulate focus to achieve a desired effect. Selective focus, for instance, draws the audience’s attention to a specific portion of the frame.

Depth of field can be either shallow or deep. Shallow depth of field is the kind in which part of the frame is soft or out of focus. Thus, the areas of focus or sharpness are limited. Deep depth of field, on the other hand, is the kind in which the entire frame, from the foreground to the background, is sharp or in focus.

These three parts of the camera affect depth of field:

  1. Aperture
  2. Focal length
  3. Focus distance

The Aperture

The aperture is the factor that most influences depth of field. The wider the aperture is, the shallower depth of field will be. A low f-number such as f/2.8 will likely render an image with some soft focus. Conversely, the narrower the aperture is, the deeper depth of field will be.

Focal Length

Next to the aperture, the second factor that most affects depth of field is focal length. The longer the lens, the shallower depth of field is. A wide angle lens (a short lens), for instance, would render an image with more depth of field than one with a telephoto lens (a long lens).

Focus Distance

Focus distance is the last factor to determine depth of field. The closer the focus distance is to the camera, the less depth of field you have. You probably have noticed this. On close-ups of actors or objects, part of the frame is usually blurrier than on wide shots of landscapes.

ISO

The ISO speed controls the sensitivity of the film or the sensor that absorbs the light. The higher the ISO speed, the more sensitive the film or sensor is to light.

The word ISO isn’t exclusive to photography. It’s the short-form name for the International Organisation for Standardisation [source: ISO]. This standards body was the first to combine competing classifications for the sensitivity of film into one uniform system. Under the ISO system, the lowest speed — and therefore the least sensitive film — is 100. From there, each setting, or stop, doubles in sensitivity and doubles in number: 200, 400, 800, 1600, 3200 and so on. The highest ISO speed on top-end digital cameras is 102,400.

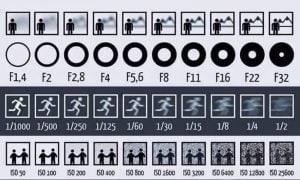
The following chart gives you a basic understanding of how aperture, shutter speed and ISO affect your filming.
Shallow DoF – Once Upon a Time in the West (1968) Dir. Sergio Leone 

Deep DoF – Citizen Kane (1940) Dir. Orson Welles

Category: General | LEAVE A COMMENT
January 21

UNIT 20 – Single Camera Techniques

Our next task we shall be covering the following criteria for Learning Aim A:

P2 – Explain the use of Single Camera Techniques

To fulfil this part of the criteria, in teams of four, you will be producing your own moving image examples to illustrate different single camera techniques, as well as providing some written information. You will be blogging this information.

For each technique below, devise an inventive and interesting way of shooting it. Also, consider the reason for using the technique, as well as the meaning / motivation behind using it.   

Shot types:

Establishing shot

Master shot

Tracking shots

Cutaways


Shot framing:

wide shot

mid shot

medium close-up

extreme close-up

point of view (POV)


Filming conversations:

over-the-shoulder angles

three angle shooting

shot-reverse-shot and the 180-degree rule

shot composition and framing.


Camera angles:

eye level

bird’s-eye

high angle

low angle

Dutch tilt


Camera movement:

handheld camera / shoulder mount / Steadicam®

dollying, trucking and panning

zooming and consideration of the effect on the angle and framing of the shot

dolly zoom or ‘trombone shot’

focus pulling


Maintaining continuity:

ensuring consistent scene set-ups

ensuring consistent lighting (lighting set-up or awareness of natural light and weather conditions at different times of day)

use of tripods to ensure shot stability and consistent positioning.

Shooting for eye-line matching.


EXAMPLE

Establishing shot

Provide a description – Usually an extreme long or long shot offered at the beginning of a scene or sequence providing the viewer with the context of the subsequent closer shots.

 Embed your own moving image shot example –

Why would you use this technique?  – At the start of a film or video it is generic for establishing shots to be composed of an external location, which usually establishes the geography, time of day and often the time of the work.  However, establishing shots can be used to indicate to an audience a shift in location or time during the body of the film. Internal establishing shots may indicate the importance of an interior. For example; the TV sitcom Friends (1995-2005) cuts from the opening title sequence establishing skyline shot of New York, to an exterior shot of the characters’ regular meeting place ‘Central Perks’. This shot need only be filmed once and can be used in every episode

Establishing shots –cut from NYC skyline to Ext. of coffee shop

How may the technique be effectively used? – The effectiveness of this technique can often provide an audience with a sense of familiarity – for example, a wide shot of the Eiffel tower immediately lets the audience know that the action is taking place in Paris; an exterior shot of Central Perks provides them with the warm feeling of the familiar.

When shooting your material you must also consider the focal distance, depth of field, lens aperture and shutter speed. For a reminder of what these are please see the next post.